Give your WordPress site its first task.
Connect the site you already have, add your agent to Slack or Telegram, and tell it what you need.
Connect your siteStart with 500 free credits. No credit card needed.
You can install a WordPress plugin in under a minute from Plugins, then Add New Plugin, then Install Now and Activate. When it goes wrong, the cause is usually the setup around the plugin: the wrong ZIP, file ownership, an upload limit, a leftover folder, or an account that is not allowed to install. Check the plugin before you install it, and check the site after you activate it.
The WordPress.org directory lists over 74,000 free plugins, and every one of them installs with the same two clicks. The clicks are rarely where things go wrong. Installs fail because of the server, the account or the file you uploaded. Activation is where a site breaks, because that is when the plugin’s code starts running next to your theme and every other plugin.
This guide covers the four ways to install a plugin, how to read the error when one fails, and what to do if the site breaks after you activate.
Check this first. Most “I can’t install plugins” threads turn out to be about the platform, not the plugin, and each platform has a different fix.
You also need the Administrator role on a single site. Editors and Authors can’t install plugins. The menu doesn’t show an error. It just leaves the option out.
Thirty seconds on the plugin’s listing saves most of the trouble later. On the Add Plugins screen and the plugin’s directory page, look at:
Only install from the official directory or from a developer you trust. A “free” copy of a paid plugin from a download site is the usual way malware gets onto a WordPress site. Install one plugin per job, too. Two SEO plugins or two caching plugins on the same site will conflict.
Then make a way back. Take a backup before you install anything on a site that matters, and use a staging copy for stores and for plugins that change checkout, forms or logins. If you aren’t sure what your backup actually includes, read our explainer on what a backup plugin covers.
Use this for any free plugin listed on WordPress.org.
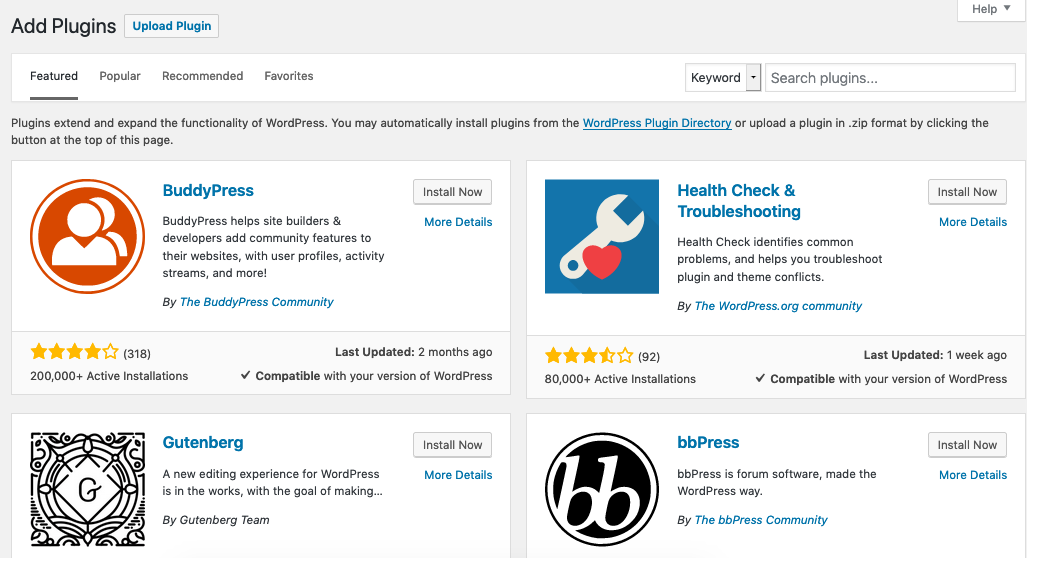
Use this for paid plugins and private plugins that don’t come from the directory.
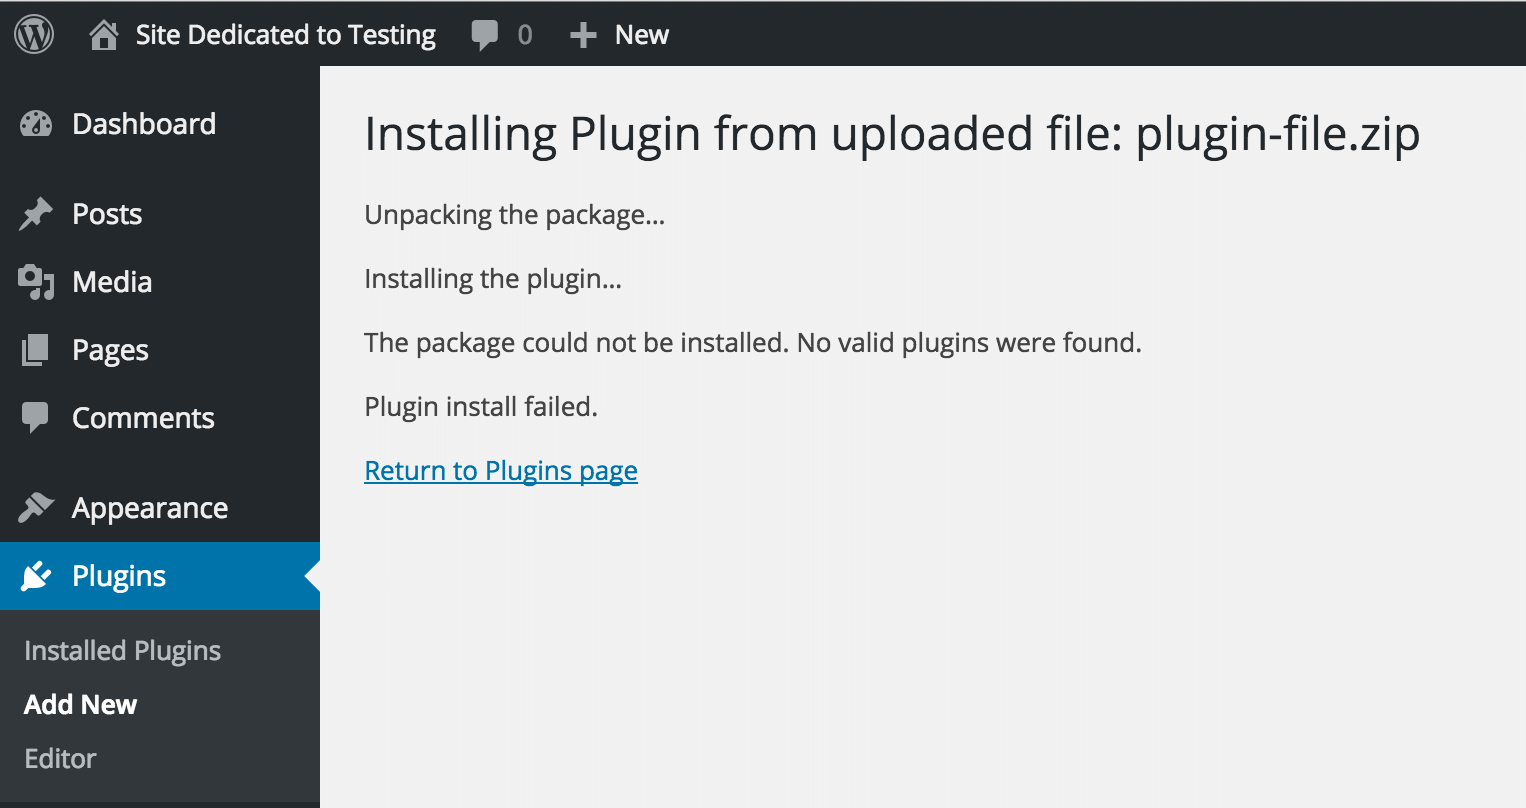
Upload the right ZIP. Marketplace downloads, ThemeForest in particular, often come as one big archive holding documentation, license files and several smaller ZIPs. The plugin is one of the inner ZIPs. If you upload the outer bundle, WordPress replies “No valid plugins were found.” The same error appears if you upload a theme here. Themes go in Appearance → Themes → Add New Theme.
Paid WooCommerce extensions have their own route. WooCommerce’s documentation says automatic installation and updates need the WooCommerce.com Update Manager plugin. A manual ZIP upload works, but the site still has to be connected to your WooCommerce.com account before the extension gets updates and support.
WordPress’s Manage Plugins documentation describes this for cases where the server isn’t set up for automatic installs. In practice you also use it when the upload hits a size limit.
wp-content/plugins/.If you have SSH access, one command installs and activates a plugin. It takes a directory slug, a ZIP path or a URL:
wp plugin install contact-form-7 --activate
wp plugin install ./my-plugin.zip --activate
To confirm the result and see versions, run wp plugin list. Our guide to wp plugin list covers the filters.
Go to Plugins → Installed Plugins. The plugin should be listed and show as active, usually with a new menu item or a Settings link. Many plugins do nothing until you finish their setup, so open the settings before you decide it’s broken.
Then open the site in a private window, logged out. Look at the home page and at whatever the plugin affects. Submit a test form, or add a product to the cart and go as far as the checkout. Visitors see the logged-out site, and conflicts often show up only there.
“Installed” doesn’t mean “working”. Google’s structured data documentation says to check a plugin’s markup with the Rich Results Test. A header-and-footer plugin can be active while your tracking tags never fire. If the plugin is supposed to produce output, check the output itself.
Read the exact message. Each one points to a different cause:
| What you see | Usual cause | Fix |
|---|---|---|
| The package could not be installed. No valid plugins were found. | Vendor bundle, theme ZIP or nested folder | Upload the inner plugin ZIP, or install the theme under Appearance |
| A prompt asking for FTP hostname, username and password | File ownership | Ask the host to fix ownership. Use SFTP in the meantime |
| Installation failed: Could not create directory | Permissions or ownership on wp-content | Same as above |
| The uploaded file exceeds the upload_max_filesize directive in php.ini, or a 413 error | Host or PHP upload limit | Upload by SFTP, or ask the host to raise the limit |
| Destination folder already exists | A leftover folder from an earlier attempt | Rename the old folder and try again |
| No Add New Plugin button, no error | Role, Multisite or WordPress.com plan | See the platform section above |
WordPress’s Updating WordPress documentation says it asks for FTP details when it can’t create files with the correct ownership. You don’t actually need FTP. The web server user doesn’t own your files. The fix is to give ownership to the right user, and which user that is depends on the host, so ask them.
Don’t set folders to 777 to make the prompt go away. WordPress’s Hardening handbook advises keeping write access to a minimum and warns that it is risky on shared hosting. Forum threads also suggest adding FS_METHOD to wp-config.php. Practitioners report it often fails when the underlying ownership is wrong. One wordpress.org case was traced to code a migration plugin had left in wp-config.php, so look there if the permissions seem right.
Two PHP settings decide how big an upload can be: upload_max_filesize and post_max_size. The lower of the two wins. Raising memory_limit changes nothing here, and some cheap or free hosts don’t let you change the limits at all. Uploading the extracted folder by SFTP avoids the limit entirely.
A failed install or update can leave a half-written folder in wp-content/plugins/. WordPress won’t write over it. Rename the folder, for example to plugin-name-old, instead of deleting it, so you still have a copy. Then install again. Reinstalling WordPress does not fix this. A plugin’s settings usually live in the database, so a fresh copy normally picks them up again.
A white screen, a “critical error” message or a broken checkout right after activation almost always means the new plugin. WordPress’s Recovery Mode, added in version 5.2, emails the admin address a link that lets you log in and deactivate the plugin that caused the fatal error.
If the email never arrives, open wp-content/plugins/ by SFTP or File Manager and rename the plugin’s folder. WordPress deactivates a plugin whose folder it can’t find. Our WordPress white screen guide covers the case where you aren’t sure which plugin to blame.
Deactivating gets you back in. It doesn’t tell you what the plugin conflicts with. WooCommerce’s conflict-testing documentation gives a method that works on any site:
Don’t do this on a live store, because every step changes what customers see. When you report the problem to the developer, include the plugin and theme versions, your WordPress and PHP versions, and the exact error text. For plugins that activate cleanly but misbehave, see fixing plugins that are not working.
Each plugin you install has to be updated as long as it stays on the site, and each update can conflict with something just as the first activation could. Read the changelog before you update. Delete plugins you no longer use, because an inactive plugin’s files are still on the server and still need patching. Plugin maintenance is a regular job, not something you do once. If you’d rather not do it yourself, SiteSelf handles plugin updates and cleanup on request from chat and reports what changed and what it checked.
Stop and contact your host if the FTP prompt or “Could not create directory” doesn’t go away. Ownership is a server setting, and guessing at permissions can open security holes. Stop if a store’s checkout breaks and you have no staging copy or backup to test against. Get help, too, if one plugin fails on several sites at once, or if a reinstall keeps failing after you have renamed the leftover folder.
Installing puts the plugin’s files in wp-content/plugins. Activating tells WordPress to load and run that code. A plugin that is installed but not activated does nothing, and that is the most common reason a “new plugin” seems not to work.
No. WordPress.com’s support documentation says plugin installation needs a paid plan. Self-hosted WordPress has no such restriction. You can install any plugin your host’s server can run.
For a small, well-known plugin on a simple site, a fresh backup is usually enough. For a store, a membership site, or anything that touches checkout, forms or logins, test on staging first. How careful to be depends on what breaks if it goes wrong.
There is no fixed number. Plugins that overlap, plugins that are abandoned and plugins you have stopped using cause more trouble than the total does. Two plugins doing the same job is the classic source of conflicts.
Bulk tools can report success when the child sites never received the file. In one wordpress.org case, a MainWP dashboard showed 100% across about 40 sites because HTTP Basic Auth on the dashboard site blocked the download. Log in to a child site and check the Plugins screen directly.
Recent WordPress versions detect that the plugin is already installed and offer to replace the current version with the upload. Take a backup first. If a leftover folder blocks the update, rename it and upload again.
How-to Tutorials
WordPress has no feature called a redirect page. What most people need is a rule that sends an old URL to a new one with the right status code, set in the right place on the site. Most redirect problems come from two of those places disagreeing, and adding another rule rarely fixes them.
Read article ›How-to Tutorials
In WordPress the favicon is called the Site Icon. On WordPress 6.5 and later you set it under Settings → General, and you don’t need a plugin or any code. Setting it is the easy part. Most of the time goes into getting browsers, caches and Google to show the new icon, and that goes faster when you find the cause before you start clearing things.
Read article ›How-to Tutorials
An “icon in WordPress” is usually one of two things: the site icon in the browser tab, or an icon inside your pages and menus. The site icon is a core setting that takes two minutes. Content icons fail quietly, usually because of a Font Awesome version conflict, and fixing them can mean a single toggle or a change to the server.
Read article ›Connect the site you already have, add your agent to Slack or Telegram, and tell it what you need.
Connect your siteStart with 500 free credits. No credit card needed.